Find Duplicate Items in Excel Tips

Suppose, we have records containing duplicate values. And we want to find records that can repeat many times in records in Excel. So, In MS Excel tools provide following way to find Duplicate value in Excel or Find Duplicate in Excel.

Find Duplicate in Excel


  1. Find Duplicate through Simple Process in Excel
  2. Find Duplicate with Custom Color or Style in Excel
  3. Find Duplicate through Function in Excel
  4. Find Duplicate Row in Excel Using Formula

So, Lets start with every option in given above with following steps:


(1). Find Duplicate through Simple Process in Excel :

For Simple Process, you have to follow the steps:

1.
 Select All Rows And Columns in Which you want to find duplicate items.

2.
 Find “Conditional Formatting” option from “Home” Tab.

3.
 Click on “Conditional Formatting”, it will show popup List Containing many options.

4.
 Go to “Highlight Cells Rules”. It also shows a list of Option. Click on “Duplicate Values..” option.

5.
 This will show “Duplicate Vales” window. Contains options and Color indicator for duplicate value.

6.
 After Selecting desire color. Click on “OK” button. This will highlight duplicate values or items with chosen color.


Find Duplicate in Excel with Simple Process


As you can see, there will be colored cells of duplicate items in MS Excel.


(2). Find Duplicate with Custom Color or Style in Excel :

If you want to change Duplicate Item’s cell’s color, border or font then, you have to follow steps:


1.
 First Select All Rows and Columns in which you want to indicate duplicate values or items.

2.
 In “Conditional Formatting” click on “New Rule…” from it.

3.
 This will display “New Formatting Rule” dialog.

4.
 Select “Format only unique or duplicate values”. After this option selection, press “Format…” button. This will show “Format Cells” dialog.

5.
 If you want to Change Font Name, Size or Font Color then go to “Font” Tab. If you want to change border Style then go to “Border” Tab. If you want To change cell’s background color then go to “Fill” Tab.

6.
 After that press “OK” button from “Format Cells” dialog. Then press “OK” button from the dialog of “New Formatting Rule”.

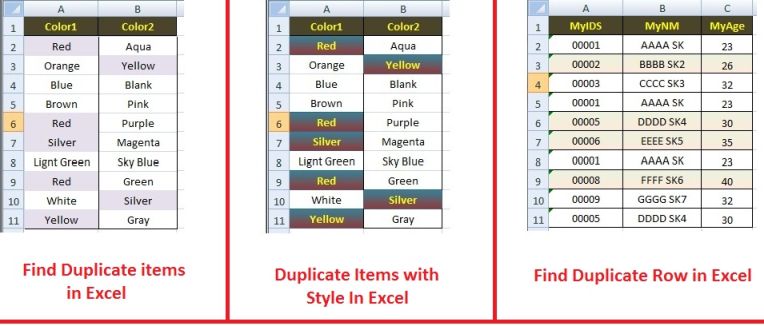
This steps show Duplicate Items in different style like bellow:

Duplicate with Custom Color and Style in Excel


This way you can Highlight Duplicate in Excel.


(3). Find Duplicate through Function in Excel :

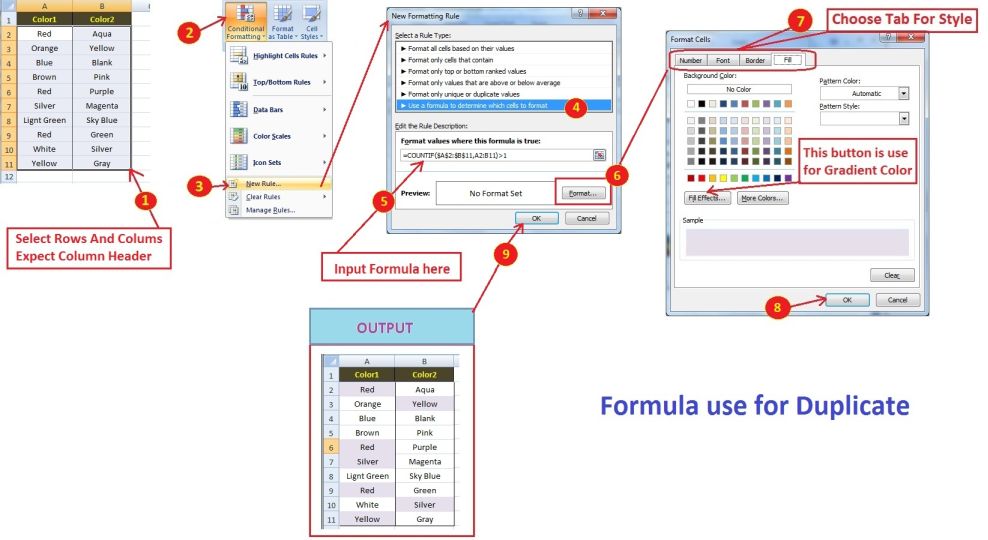
Now if you want to find duplicate items through custom rules applying with formula. Then we have to use “COUNTIF” function like following steps:

1.
 Same as above Go to “Conditional Formatting” then click on “New Rule…”.

2.
 This will show “New Formatting Rule” dialog. Here we select “Use a formula to determine which cells to format”. After selecting this, “Format values where this formula is true:” Formula Box will appear.

3.
 The duplicate formula function Syntax is :

=COUNTIF (range, criteria)>1

 Details:

=COUNTIF(Selection Of Rows and Columns, Selection For Which cell will be count) > 1


Example:

=COUNTIF($A$2:$B$11, A2:B11) >1


4.
 Then click on “Format…” button for color and style of duplicate items. Then click “OK” button.


This process will also show duplicate items with style and color.

Find Duplicate through function in Excel


(4). Find Duplicate Row in Excel Using Formula :

Suppose, you want to check duplicate Row in Excel not duplicate cell. Then you have to use same process as describe above but using different formula “COUNTIFS” with following steps:

1.
 Same as above Go to “Conditional Formatting” then Click on “New Rule…”.

2.
 This will show “New Formatting Rule” dialog. Now go to the option “Use a formula to determine which cells to format”. After Selecting this, “Format values where this formula is true:” Formula Box will appear.

3.
 Write formula as describe below:

 
=COUNTIFS($A$2:$A$11, $A1, $C$2:$C$11, $C1)>1


This will show Duplicate Row in Excel.

Find Duplicate Row in Excel


So, In this way we can find the duplicate items in Excel and Duplicate rows in Excel and find Duplicate in Excel with easy tech tips.

Excel Filter Types And Use Filter in Excel Tips

In MS Office, you will find that there is many features which provide easy data handling for any company or concern. So here we will discuss and learn about Types of Filter in Excel and Use Excel Filter with easy tech tips. In MS Office, Excel provide many advanced features.


Text_And_Number_Filters_In_Excel

Shortcut Key :  ( Ctrl + Shift + L) or ( Ctrl + Shift + l) for Add Filter in Excel Column or Remove Filter in Excel Column.

Find Filter Option In Excel :

First When you open excel sheet, you will find that your excel file open with “Home” tab. This tab contain some option.

 1.  Find ‘Editing’ option from this tab. 

 2.  ‘Editing’ option contain many options (‘AutoSum’, ‘Fill’, ‘Clear’, ‘Sort & Filter’, ‘Find & Select’). 

 3.  Here, you will click on ‘Sort & Filter’ Option. This will Show Options List. Select ‘Filter’ option.

Filter Option Excel

Or

 1.  Find “Data” Tab from menu. This Tab contain many option.

 2.  Go to “Sort & Filter” Option. And Select “Filter” option.

Filter Option Excel Step 2


 3.  This will add filter button Filter Button in Excel on every Column Header as describe above image. 

 4.  When you click on this button, it will show popup window containing filter option. Like above image. And when you apply filter then the Filter Button Apply Filter Button in Excel icon will change.


Here are following excel filter types:

  1. Manual Filters
  2. Text Filters
  3. Numbers Filters
  4. Filter by Color in Excel


Now Lets Start with Point to Point and step by step to understand amazing feature of filters.

(1). Manual Filters :

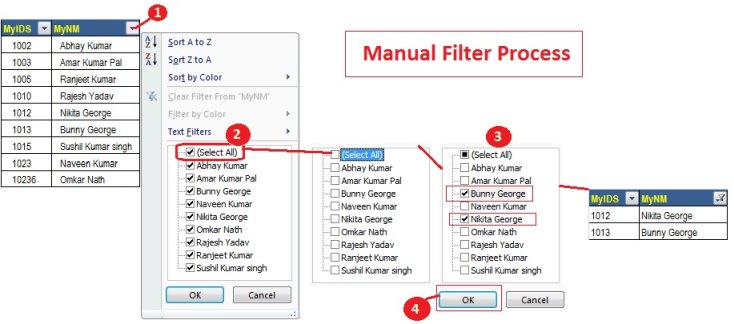
If you want to set filter manually, then there is a list will popup when you click on Filter button containing particular column record. 

First remove check from “Select All”. 

Or Clear tick mark from all Check Boxes. Then check that items which you want to show like bellow.

Manual Filter in Excel


As you can see, the output will appear in desire filter selection base.


(2). Text Filters :

In this filter, if table column's rows contain string or alphanumeric value then this filter automatic show "Text Filters" option after clicking on filter button on particular column.

This Filter have many options. The details and steps are as follows:


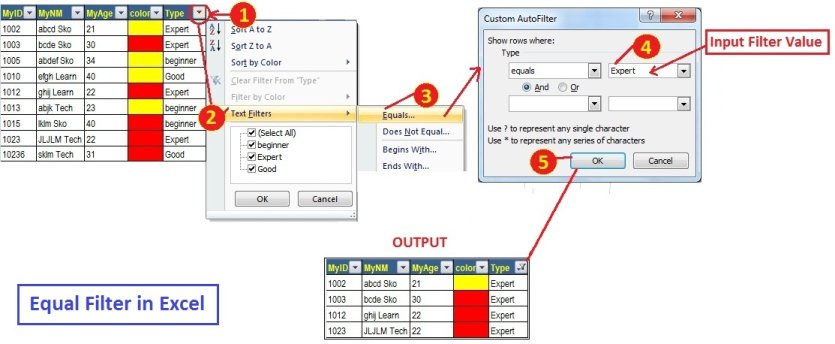
Equal Filter in Excel :

1. In this filter select "Equal" option. 

2. Input your filter value or string in "Custom AutoFilter" window's Textbox.

3. Then click on "OK" button.

Equal Filter in Excel

And the output will look like above.


Begins With Filter in Excel :

If you want to show data that contain starting character then this filter is helpful.

1. Click on "Begins With..." option from "Text Filters".

2. Then once again Input some part or the beginning of string in TextBox which is in the side of Type Combobox with "begins with" option.

Begins With Filter in Excel


Ends With Filter in Excel :

If you want to show records according to containing last character. Then this filter will help.

1. Click on "Ends With..." option from "Text Filters".

2. Then once again Input some character that end with that string which you want to filter in TextBox which is in the side of Type Combobox with "Ends with" option.


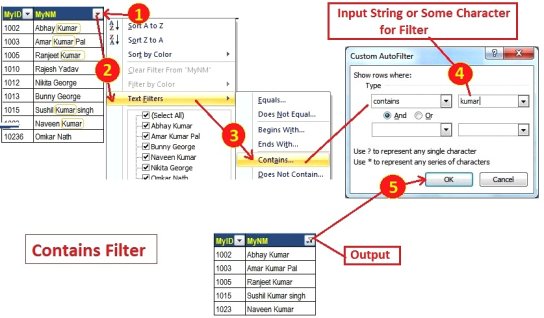
Contains Filter in Excel :

This is the most used filter in business area. If you want to search records or list of all record that have match any character of that particular cell's then this will help.

1. Click on "Contains.." option from "Text Filters".

2. Then once again Input some character that will be exist in string which you want to filter in TextBox which is in the side of Type Combobox with "contains" option.

Contains Filter in Excel


(3). Numbers Filters :

In this filter we will learn some filters which is mostly used. This filter will apply on That Column which have a list of Number or Numeric values.


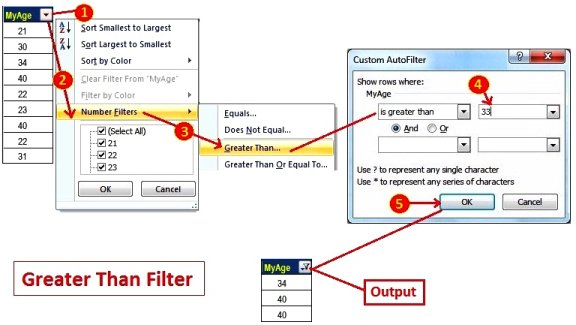
Greater Than Filter in Excel :

Suppose, there is a list of Numbers, in which you want to find Greater Numbers list with given filter number. Then this filter will help.

1. Click on "Greater Than..." option from "Number Filters...".

2. Then input number in "Custom AutoFilter" dialog, which will filter greater number.

Greater Than Filter in Excel


Less Than Filter in Excel :

Suppose, there is a list of Numbers, in which you want to find Less Numbers list with given filter number. Then this filter will help.

1. Click on "Less Than..." option from "Number Filters...".

2. Then input number in "Custom AutoFilter" dialog, which will filter Less number.

Less than filter in Excel


Between Filter in Excel :

Between filter will apply when you input Greater Than value and Less Than Value in filter like below. This will show the Between Filter Output describe in image.

1. Click on "Between..." option from "Number Filters...".

2. Then input number in "Custom AutoFilter" dialog, which will between the greater than or equal And less than or equal number of given input value.

Between Filter in Excel


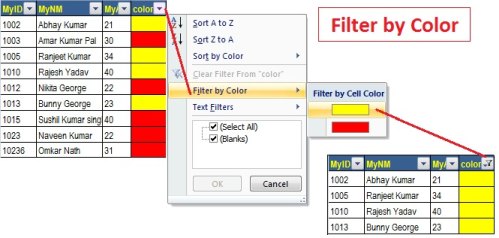
(4). Filter by Color in Excel:

Here we can filter records by particular color selection. Following Image will describe how it will work?

Note: This filter will work only when cells contain background color on particular column's rows.

1. For this filter you have to click on "Filter by Color" option.

2. Choose whatever color's record want to show like below.

Filter by Color in Excel

Show Records from particular Column's rows color in Excel.


So, these are the Types Of Filter in Excel and How to Use Excel Filter with step by step process.

How to Add Columns and Items in TreeView in Python Tkinter

 If you want to show items in rows and columns like table, tkinter provide Treeview widgets in python. This widget is use as Listview for display records. So here we learn Listview in Python or How to add Column Hearder in Treeview in Python Tkinter or How to add items in Treeview in Tkinter python

Now, we will cover following points that will solve all given questions.


  1. Add Column in TreeView in Tkinter Python
  2. Set Column width in TreeView in Tkinter
  3. Set Treeview Column color in tkinter
  4. Add Items in Treeview in Tkinter
  5. Tkintter Treeview Row Color in Python


So, here we use Treeview as Listview in Tkinter with following way:

(1). Add Column in TreeView in Tkinter Python :

Now, let’s see how we add columns with names with different ways in python.

Fist Way:
from tkinter import *
from tkinter import ttk

TrvFrm = Tk()

MyTrv = ttk.Treeview(TrvFrm, columns=('Column1', 'Column2', 'Column3'), show='headings')

MyTrv.heading('MyCl1', text='SKID')
MyTrv.heading('MyCl2', text='SKName')
MyTrv.heading('MyCl3', text='SKFName')


Second Way:
from tkinter import *
from tkinter import ttk

TrvFrm = Tk()

MyTrv = ttk.Treeview(TrvFrm, show='headings')
MyTrv['columns']=('MyCl1', 'MyCl2', 'MyCl3')

MyTrv.heading('MyCl1', text='SKID')
MyTrv.heading('MyCl2', text='SKName')
MyTrv.heading('MyCl3', text='SKFName')

You can choose any one of them and proceed for further Process, So, Let’s see what will happen?

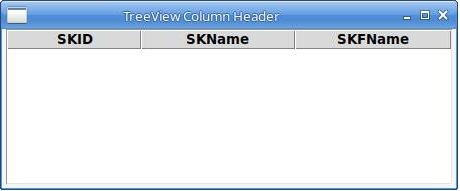
Show Columns in TreeView in Tkinter


Now, here we will put complete code with output as follows:
from tkinter import *
from tkinter import ttk

TrvFrm = Tk()
TrvFrm.title('TreeView Column Header')
TrvFrm.geometry('305x110')

MyTrv = ttk.Treeview(TrvFrm, columns=('MyCl1', 'MyCl2', 'MyCl3'), show='headings')

MyTrv.heading('MyCl1', text='SKID')
MyTrv.heading('MyCl2', text='SKName')
MyTrv.heading('MyCl3', text='SKFName')

MyTrv.pack(side=TOP, fill="both", expand=True)

TrvFrm.mainloop()


When you run this code, it will show Form including Treeview with columns in python.

Add_Column_Header_in_TreeView_Tkinter


(2). Set Column width in TreeView in Tkinter :

If you want to set or fix Column width at run time then you have to write code like:

 
MyTrv.column('MyCl1', width=40)
MyTrv.column('MyCl2', width=50)
MyTrv.column('MyCl3', width=70)


Ok, we will insert this code in our existing above code.
 
from tkinter import *
from tkinter import ttk

TrvFrm  = Tk()
TrvFrm .title('TreeView Column Header')
TrvFrm .geometry('300x100')

MyTrv = ttk.Treeview(TrvFrm, show='headings')

#Create Column
MyTrv['columns']=('MyCl1', 'MyCl2', 'MyCl3')

#Set Column Name
MyTrv.heading('MyCl1', text='SKID')
MyTrv.heading('MyCl2', text='SKName')
MyTrv.heading('MyCl3', text='SKFName')

#Set Column Width
MyTrv.column('MyCl1', width=40)
MyTrv.column('MyCl2', width=50)
MyTrv.column('MyCl3', width=70)

MyTrv.pack(side=TOP, fill="both", expand=True)

TrvFrm.mainloop()


After running this code her we find output:

Set_Column_Width_in_Treeview_in_Tkinter

As you can see, we adjust the treeview Column width in tkinter according to need.


(3). Set Treeview Column color in Tkinter :

If you want to change Tkinter Treeview column color like Background color or foreground color and also want to change Treeview Column Font size in Tkinter or Treeview Column Font Name in Tkinter. Then just add Tkinter ttk style on your code.

mytkstyle = ttk.Style()
#Treeview Style in tkinter with Column Color with Font Size and Font Name
mytkstyle.configure("Trstyle.Treeview.Heading", background='#ffedd4', foreground='#f38755', font=('Georgia', 10,'bold'))

#Add ttk style on treeview
MyTrv = ttk.Treeview(TrvFrm, show='headings', style="Trstyle.Treeview")


Now, just add above given code and implement code like bellow given example:
 
from tkinter import *
from tkinter import ttk

TrRoot = Tk()
TrRoot.title('TreeView Column Header')
TrRoot.geometry('300x100')

mytkstyle = ttk.Style()

mytkstyle.configure("Trstyle.Treeview.Heading", background='#ffedd4', foreground='#f38755', font=('Georgia', 10,'bold'))

TkTree = ttk.Treeview(TrRoot, show='headings', style="Trstyle.Treeview")
TkTree['columns']=('MyCl1', 'MyCl2', 'MyCl3')

TkTree.heading('MyCl1', text='SKID')
TkTree.heading('MyCl2', text='SKName')
TkTree.heading('MyCl3', text='SKFName')

TkTree.pack(side=TOP, fill="both", expand=True)

TrRoot.mainloop()


Now the above code is ready for display following output with different color of width of column after executing code:

Set_Column_Color in_Treeview and Font_in_Treeview_in_Tkinter


Add items in Treeview in Tkinter Python

Add items in Listview in Tkinter


(4). Add Items in Treeview in Tkinter :

Here we add some items or records in Treeview as Listview in Tkinter using ‘insert’ command. You can add items manually or through Loop as describe bellow:

(a) Add Items in Treeview in Tkinter manually :

from tkinter import *
from tkinter import ttk

TrvFrm  = Tk()
TrvFrm .title('TreeView Column Header')
Trv = ttk.Treeview(TrvFrm, show='headings')
Trv['columns']=('Clm1', 'Clm2', 'Clm3')

Trv.heading('Clm1', text='SKID')
Trv.heading('Clm2', text='SKName')
Trv.heading('Clm3', text='SKFName')

Trv.insert('', END, values=('1', 'SKO', 'AAAAAAA'))
Trv.insert('', END, values=('2', 'Tech', 'BBBBBB'))
Trv.insert('', END, values=('3', 'Learn', 'CCCCCCCC'))


Trv.pack(side=TOP, fill="both", expand=True)

TrvFrm.mainloop()


Output:

Manually_Add_Items_in_Treeview_in_Tkinter


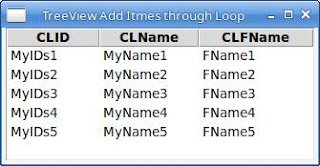
(b)  Add Items in Treeview in Tkinter through Loop :

Suppose you want to add some items through loop in Treeview then here we use 'for' loop in python for insert records in treeview tkinter.


from tkinter import *
from tkinter import ttk

TrvFrm  = Tk()
TrvFrm .title('TreeView Add Itmes through Loop')

MyTrv = ttk.Treeview(TrvFrm, columns=('MyCl1', 'MyCl2', 'MyCl3'), show='headings')

MyTrv.heading('MyCl1', text='CLID')
MyTrv.heading('MyCl2', text='CLName')
MyTrv.heading('MyCl3', text='CLFName')

for sn in range(1, 6):
    MyTrv.insert('', END, values=('MyIDs'+ str(sn), 'MyName'+ str(sn), 'FName'+ str(sn)))

MyTrv.pack(side=TOP, fill="both", expand=True)

TrvFrm.mainloop()


Output:

Loop_To_Add_Items_in_Treeview_in_Tkinter


(5). Tkinter Treeview Row Color in Python :

Now, the next step to add color in rows according to desire. For it, we will use, 'ttk.Style' for color and 'tag_configure' for treeview widget for apply color. Now here we use following code for better look of treeview as Table in tkinter.

ttk style in Treeview in tkinter

Example:
from tkinter import *
from tkinter import ttk

TrvFrm = Tk()
TrvFrm.title('TreeView Row Color')
TrvFrm.geometry('300x150')

style = ttk.Style(TrvFrm)

# ttk Style theme
style.theme_use("default")

# Set treeview Row Colomn Color
style.map('Treeview', background=[('selected', '#BFBFBF')])

MyTrv = ttk.Treeview(TrvFrm, columns=('MyCl1', 'MyCl2', 'MyCl3'), show='headings', selectmode = 'browse')
MyTrv.column("#0", width=60, minwidth=30, stretch=NO)
MyTrv.column("MyCl1", width=80, minwidth=20, stretch=NO)
MyTrv.column("MyCl2", width=100, minwidth=30, stretch=NO)
MyTrv.column("MyCl3", width=100, minwidth=30, stretch=NO)

MyTrv.heading('MyCl1', text='CLID')
MyTrv.heading('MyCl2', text='CLName')
MyTrv.heading('MyCl3', text='CLFName')

# Set treeview row font color or foreground color
MyTrv.tag_configure('Cl1', background = '#f9fbdb', foreground = '#c26981')
MyTrv.tag_configure('Cl2', background = '#fbdbf1', foreground = '#6f9594')

for sn in range(1, 6):
    if (sn % 2) == 0:  
        MyTrv.insert('', END, values=('MyIDs' + str(sn), 'MyName' + str(sn), 'FName' + str(sn)), tags = 'Cl1')
    else:  
        MyTrv.insert('', END, values=('MyIDs' + str(sn), 'MyName' + str(sn), 'FName' + str(sn)), tags = 'Cl2')

MyTrv.pack(side=TOP, fill="both", expand=True)

TrvFrm.mainloop()

After that, we will find a colorful listview or treeview as given in following output:
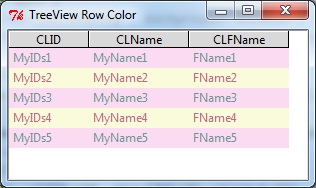
tkinter Treeview Row Color


These are the tips and way to show data in treeview in tkinter. And you can choose color of tkinter treeview according to need for your project. If you follow above given point then you can create an application with showing data in table model with desire color. So, this is the way to Add Columns in treeview tkinter or Add items in Treeview in Tkinter or Style treeview in tkinter.

Style and Use Entry Box in tkinter and TextBox in tkinter

If you want to use Entry Box in tkinter and TextBox in tkinter or you can say that tkinter Entry Widget and tkinter Text Widget. So, here we describe following way to use or Style EntryBox or Style TextBox in tkinter. The Text or Entry widget Style will be defined in following points.
 
  1. Create and Set Location and Size of Entry or Text Widget in tkinter
  2. Set Color of Entry or Text in tkinter
  3. Set Selection Background and Foreground Color of Entry or Text in tkinter
  4. Text or Entry Box Font Setting in tkinter
  5. Text or Entry Border Style in tkinter


Tkinter Entry Widget Style in Python

Now, here we learn interesting way to style widget in tkiter.


(1). Create and Set Location and Size of Entry or Text Widget in tkinter :

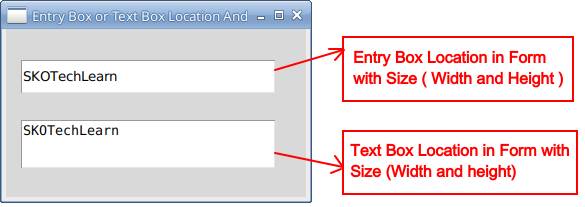
Now, if you want to set particular control or widget in desire location of window and want to set Entry box Height and Width in tkinter then we use “place” method in following way:

from tkinter import *  

TkFrm = Tk()
TkFrm.geometry("250x200+500+400")
TkFrm.title('Entry Box or Text Box Location And Size in Tkinter')
#Create Entry Box
MyEntryBox1 = Entry(TkFrm)
#Set Entry Widget Location and Size in Form
MyEntryBox1.place(x=14, y=30,  width=256, height= 35)
#Add Text to Entry Widget in Python
MyEntryBox1.insert(END, 'SKOTechLearn')

#Create Entry Box
MyTxtBox = Text(TkFrm)
#Set Text Widget Location and Size in Form
MyTxtBox.place(x=14, y=90, width=256, height=50)
#Add Text to Text Widget in Python
MyTxtBox.insert(END, 'SKOTechLearn')

TkFrm.mainloop()


Here we add some text in both widgets in python tkinter. And after running it will show output:

Tkinter Entry Size and Location


This way we can increase or decrease height and width of tkinter widgets.
 

(2). Set Color of Entry or Text in tkinter :

Here, we set Background, Foreground, Border Selection color or Entry Box or Text Box in Tkinter.

Following method will use for color setting in tkinter:
MethodDetails
bg or background Use for Background color of Widgets
Fg or foreground Use for Font color of widgets
highlightbackground This method is use for Border color
highlightcolor This method is use for border color when focus on entry or text widget.


Entry And Text Widget Color Setting in tkinter:

When you want to apply border color change when lost focus and got focus, and want to change font and back color, you have to apply and write following code:

from tkinter import *  

TkFrm = Tk()
TkFrm.geometry('290x200+500+300')
TkFrm.title('Entry Box or Text Box Color Setting in Tkinter')

#Set Entry Widget Color and Border Color
MyEntryBox1 = Entry(TkFrm, highlightcolor = 'green', bg='#F3FEFF', fg='red', highlightbackground='red')

#Set Widget Location and Size in Tkinter
MyEntryBox1.place(x=14, y=30,  width=256, height= 35)
#Add Text to Entry Widget in Python
MyEntryBox1.insert(END, 'SKOTechLearn')

# Text Widget Color and border Color in Tkinter
MyTxtBox = Text(TkFrm, highlightcolor = 'blue', highlightbackground='brown', fg='Navy', bg='#FFEFE7')
#Set Widget Location and Size in Form
MyTxtBox.place(x=14, y=90, width=256, height=50)
#Add Text to Text Widget in Python
MyTxtBox.insert(END, 'SKOTechLearn')

TkFrm.mainloop()


When you execute this code, and when you focus on widget, it will change the border color as describe bellow image.

Set Tkinter Entry widget Color in Python


(3). Set Selection Background and Selection Foreground Color of Entry or Text in tkinter :

If you want to change Selection Color, when you select String or Value in Entry or Text Box, then you have to use ‘selectbackground’ for selection back color and ‘selectforeground’ for selection font color.

from tkinter import *  

TkFrm = Tk()
TkFrm.geometry('290x200+500+300')
TkFrm.title('Entry Box or Text Box Selection Color in Tkinter')

#Selection Color Setting in Tkinter Entry Widget
MyEntryBox1 = Entry(TkFrm,  selectbackground='yellow', selectforeground='green')
MyEntryBox1.place(x=14, y=30,  width=256, height= 35)
MyEntryBox1.insert(END, 'SKOTechLearn')

#Selection Color Setting in Tkinter Text Widget
MyTxtBox = Text(TkFrm, selectforeground='yellow', selectbackground='red')
MyTxtBox.place(x=14, y=90, width=256, height=50)
MyTxtBox.insert(END, 'SKOTechLearn')

TkFrm.mainloop()


Output:

Tkinter Entry Selection Color in Python


(4). Text or Entry Box Font Setting in tkinter :

Now, lets see the code, how to change font in Entry widget in tkinter or change font in Text widget in tkinter. Or Change the font size in tkinter widgets.

from tkinter import *  

TkFrm = Tk()
TkFrm.geometry('290x200+500+300')
TkFrm.title('Entry Box or Text Box Font Setting in Tkinter')

#Font Settings in tkinter
MyEntryBox1 = Entry(TkFrm,  font='Verdana 12 bold')
MyEntryBox1.pack()
MyEntryBox1.insert(END, 'SKOTechLearn')

#Font Settings in tkinter
MyTxtBox = Text(TkFrm, font='Georgia 13 italic bold')
MyTxtBox.pack()
MyTxtBox.insert(END, 'SKOTechLearn')

TkFrm.mainloop()


Output:

Entry widget Font Setting in Tkinter


(5). Text or Entry Border Style in tkinter :

Now, let’s find the last point to change Border Style in tkinter widgets. Can use following method in you code. You can change style of Text Widget Border in tkinter or Entry Widget Border in Tkinter.

MethodDetails
relief Change Border Style (raised, sunken, solid, flat, ridge, groove)
highlightthickness Change Border width when widget gain focus
borderwidth Change Border Width


Lets find code:

from tkinter import *  

TkFrm = Tk()
TkFrm.geometry('290x200+500+300')
TkFrm.title('Entry Box or Text Box Border Setting in Tkinter')

#Tkinter Widgets Border Setting
MyEntryBox1 = Entry(TkFrm,  relief='raised', highlightthickness=1, borderwidth=2)
MyEntryBox1.pack()
MyEntryBox1.insert(END, 'SKOTechLearn')

#Tkinter Widgets Border Style
MyTxtBox = Text(TkFrm, relief='sunken', highlightthickness=1, borderwidth=2)
MyTxtBox.pack()
MyTxtBox.insert(END, 'SKOTechLearn')

TkFrm.mainloop()


Output:

Tkinter Entry Border Style

So, this way you can change Enty Widget Style in Tkinter or Text Widget Style in Tkinter.

PySide Center Screen and Window State Maximized in PySide

As you know PySide provide stylish GUI comparing Tkinter and feature rich QT base application. So first, here we learn how to set Center Screen window in Pyside in Python? And also we learn Window State Maximize in Pyside in Python. Here we also include how to Set window title in PySide?

Let’s find it in following points:

  1. Set window Size in PySide6 and Set Window Location in PySide6
  2. Python Center Screen Window in PySide6
  3. Set Window State Maximized in PySide6
  4. Set Window Title in PySide6


Window State Maximize in PySide


How to Set Center Screen in Tkinter and Set window size in Tkinter?

(1). Set Window Size in PySide6 and Set Window Location in Pyside6 :

Suppose, you want to create a Form using PySide and want to display at run time with specific size with specific location on screen. Then here PySide provide ‘setGeometry’ or ‘move’ and ‘resize’ function. The syntax is used in following way:


‘setGeometry’ Syntax:
MainForm.setGeometry(Form_Left, Form_Top, Form_Width, Form_Height)

Example:
from PySide6.QtWidgets import QMainWindow, QApplication

SKapp = QApplication()
MyPyForm = QMainWindow()

#Set Form's Location and Size
MyPyForm.setGeometry(150, 100, 330, 250)

MyPyForm.show()

SKapp.exec()


‘move’ Syntax:
MainForm.move(Left_Location, Top_Location)


‘resize’ Syntax:
MainForm.resize(Form_Width, Form_Height)


Now, we are using both function in given example:
from PySide6.QtWidgets import QMainWindow, QApplication

SKapp = QApplication()
MyPyForm = QMainWindow()

#Set Location of Form in PySide
MyPyForm.move(150, 100)
#Set Form Size in PySide
MyPyForm.resize(330, 250)

MyPyForm.show()

SKapp.exec()


Now, you will get same output when run application like bellow:

Set Window Size and Location in Pyside


(2). Python Center Screen Window in PySide6 :

In this point, we learn how to set start position for form in center screen. For center screen form in Pyside we have to import following:
from PySide6.QtGui import QScreen

Here are following two ways from which you can set Center Screen in Python.

Note: Remember one thing before positioning form in center screen, you have to first define the form or dialog size then write center screen code.

First we use ‘QScreen.availableGeometry(QApplication.primaryScreen())’. This will show screen available geometry.

PySide Center Screen Example 1:
from PySide6.QtWidgets import QMainWindow, QApplication
from PySide6.QtGui import QScreen

SKapp = QApplication()
MyPyForm = QMainWindow()

#Set Form Size
MyPyForm.resize(330, 250)

#Get Screen geometry
SrcSize = QScreen.availableGeometry(QApplication.primaryScreen())
#Set X Position Center
frmX = (SrcSize.width() - MyPyForm.width())/2
#Set Y Position Center
frmY = (SrcSize.height() - MyPyForm.height())/2
#Set Form's Center Location
MyPyForm.move(frmX, frmY)

MyPyForm.show()

SKapp.exec()


Pass Value from Text To Label in Tkinter.


Pyside Center Screen Example 2:
from PySide6.QtWidgets import QMainWindow, QApplication
from PySide6.QtGui import QScreen

SKapp = QApplication()
MyPyForm = QMainWindow()

#Set Form's Location and Size
MyPyForm.resize(330, 250)

#Get Screen Center Position
Fmcenter = QScreen.availableGeometry(QApplication.primaryScreen()).center()
Fmscr = MyPyForm.frameGeometry()

#Set Form in Center Position
Fmscr.moveCenter(Fmcenter)

MyPyForm.show()

SKapp.exec()


Both codes will show same output:
Pyside Center Screen Window


(3). Set Window State Maximized in Pyside6 :

Here SKOTechLearn describe two way to set window state maximized in PySide, and both will show same output as described bellow:

PySide6 Maximized Form Example 1:

from PySide6.QtWidgets import QMainWindow, QApplication
from PySide6.QtGui import QScreen

SKapp = QApplication()
MyPyForm = QMainWindow()

#Set Form's Location and Size
MyPyForm.resize(330, 250)

SrcSize = QScreen.availableGeometry(QApplication.primaryScreen())

#Get Screen Width
frmX=SrcSize.width()

#Get Screen Height
frmY=SrcSize.height()

#Pyside Window State maximized
MyPyForm.setGeometry(0, 0, frmX, frmY)

MyPyForm.show()

SKapp.exec()


PySide6 Maximize Form Example 2:

import sys
from PySide6.QtWidgets import QMainWindow, QApplication
from PySide6.QtGui import QScreen

class App(QMainWindow):

    def __init__(self):
        super().__init__()
        self.title = 'PySide6 Maximize Window State'
        
        #Pyside6 Maximize Form
        MyScn = QScreen
        self.setGeometry(0, 0, MyScn.availableGeometry(QApplication.primaryScreen()).width(), MyScn.availableGeometry(QApplication.primaryScreen()).height())  
    
        self.show()    
    
if __name__ == '__main__':
    app = QApplication(sys.argv)
    ex = App()
    sys.exit(app.exec())


You will get maximized form:
PySide Maximize Window State


(4). Set Window Title in PySide6 :

The simple way to set window title or form title in PySide using ‘setWindowTitle’. Her we use it with two way at design time and change Form title in PySide at run time.


(i). Set Window Title at design time :
import sys
from PySide6.QtWidgets import QApplication, QMainWindow

app = QApplication(sys.argv)
mainwindow = QMainWindow()

mainwindow.setGeometry(300, 300, 300, 150)

#Set Window Title in PySide
mainwindow.setWindowTitle('PySide Set Window Title')

mainwindow.show()

app.exec()   


(ii). Set Window Title at run time :

Here we use ‘QPushButton’ to change Title at run time when we click on button.
import sys
from PySide6.QtWidgets import QMainWindow, QPushButton, QApplication

class MyTitle(QMainWindow):
    
    def __init__(self):
        super().__init__()
        
        self.initUI()
        
    def initUI(self):      

        Pysbtn = QPushButton('Show title', self)
        Pysbtn.move(70, 40)
        
        #Call Click Event which is defined bellow
        Pysbtn.clicked.connect(self.ClickToChangeTitle)
        
        self.setGeometry(300, 300, 300, 150)
        self.show()


    #QPushButton Click Event in PySide    
    def ClickToChangeTitle(self):
            self.setWindowTitle('Click to Change Title in Pyside')
        
if __name__ == '__main__':  
    app = QApplication(sys.argv)
    ex = MyTitle()
    sys.exit(app.exec())


Output:
Set Window Title in PySide


Set Window Title in Python


Now here are some Pyside windows tips, this way you can easily Maximized Window in PySide and Also Set Center Screen Window in PySide in Python. And Also Set Window Title or Form Title in PySide.