Listview is basically a table on which user can easily add, edit or delete selected record. You can easily show records in controls like: TextBox, Label, ListBox, ComboBox etc. In this post, we describe the process to Edit Listview Items in Vb6.0 and Delete Items from Listview with Steps and image as well as regarding description. So, if you want to proceed to learn how to Edit or Delete Selected Listview Items in VB6.0, then follow the following.
First you have to add Listview control in Form1.
We will follow step by step process to fully understand.
First of all, there is main point that this control must contain at least one record. So, first to understand this process, Just add some records in this control.
So, let’s start.
Tips to Display File's Icons in Listview
Suppose, Form1 contain column’s related Textbox like: ‘CustName_Txt’, ‘CustAge_Txt’, ‘CustAddress_Txt’, ‘CustMoNo_Txt’. These Textbox shows Listview’s items data for editing or updating.
The following image will describe the related above description’s confusion.
The description is easily understandable that how to define controls in Form and How to show data to Textbox and selected row index in Label?
Listview checked item show in another control
After selecting item from Listview, its related index id and data will show in Textbox and Label.
Suppose, we Edit Listview Record from Row No 2. Then select Row 2 and it will show data in Textbox.
Suppose, we drag a command button with caption ‘Edit or Update’, assign this command button ‘Name’ as “Edit_Cmd”.
And Change Listview1 name as 'LVData1'
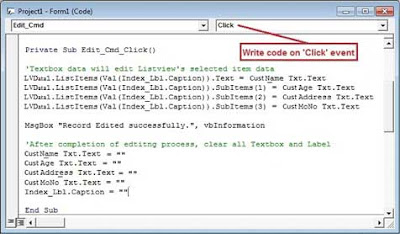
Now, double click on ‘Edit or Update’ command button and write code on its ‘Click’ event as shown below.
Code:
First you have to add Listview control in Form1.
We will follow step by step process to fully understand.
- Update or Edit Selected Items From Listview
- Delete Selected Items From Listview
First of all, there is main point that this control must contain at least one record. So, first to understand this process, Just add some records in this control.
So, let’s start.
(1). Update or Edit Selected Items From Listview:
Suppose, Listview contain 4 column like: ‘Customer_Name’, ‘Cust_Age’, ‘Cust_Address’, ‘Cust_MoNo’.Tips to Display File's Icons in Listview
Suppose, Form1 contain column’s related Textbox like: ‘CustName_Txt’, ‘CustAge_Txt’, ‘CustAddress_Txt’, ‘CustMoNo_Txt’. These Textbox shows Listview’s items data for editing or updating.
Note: You have to drag a label and define its name ‘Index_Lbl’. ‘Index_Lbl’ will present the item’s index number.
The following image will describe the related above description’s confusion.
 |
| Selected Record and Controls Description |
The description is easily understandable that how to define controls in Form and How to show data to Textbox and selected row index in Label?
Listview checked item show in another control
After selecting item from Listview, its related index id and data will show in Textbox and Label.
Suppose, we Edit Listview Record from Row No 2. Then select Row 2 and it will show data in Textbox.
Suppose, we drag a command button with caption ‘Edit or Update’, assign this command button ‘Name’ as “Edit_Cmd”.
And Change Listview1 name as 'LVData1'
Now, double click on ‘Edit or Update’ command button and write code on its ‘Click’ event as shown below.
Code:
Private Sub Edit_Cmd_Click()
 With LVData1
    'Every Textbox data will edit Listview's selected item data
    .ListItems(Val(Index_Lbl.Caption)).Text = CustName_Txt.Text
    .ListItems(Val(Index_Lbl.Caption)).SubItems(1) = CustAge_Txt.Text
    .ListItems(Val(Index_Lbl.Caption)).SubItems(2) = CustAddress_Txt.Text
    .ListItems(Val(Index_Lbl.Caption)).SubItems(3) = CustMoNo_Txt.Text
 End With
 MsgBox "Record Edited successfully.", vbInformation

 'After completion of edtitng process, clear all Textbox and Label
 CustName_Txt.Text = ""
 CustAge_Txt.Text = ""
 CustAddress_Txt.Text = ""
 CustMoNo_Txt.Text = ""
 Index_Lbl.Caption = ""
End Sub
 |
| Click Event code |
Or type code through another way
Code:
Private Sub Edit_Cmd_Click()
  'Index_Lbl: is item index number
  Dim indx As Integer
  indx = Val(Index_Lbl.Caption)

  With LVData1
      'Textbox data will edit Listview's selected item data
      .ListItems(indx).Text = CustName_Txt.Text
      .ListItems(indx).SubItems(1) = CustAge_Txt.Text
      .ListItems(indx).SubItems(2) = Cust Address_Txt.Text
      .ListItems(indx).SubItems(3) = Cust MoNo_Txt.Text
  End With
  MsgBox "Record Edited successfully.", vbInformation

End Sub
 |
| Edit Record Description and Output |
After writing this code, run application. After running application, select any item for edit from LVData1. Then click on ‘Edit or Update’ button. After that a message box will show for completion of editing or updating record.
Tips to Get ListView data in TextBox
(2). Delete Selected Items From Listview :
If you want to remove selected items, there are 2 processes for it.(a). Delete Listview Items through Command Button
(b). Delete Listview Items through Press ‘Delete’ key
Now follow it with details.
(a). Delete ListView Items through Command Button:
Drag command button control to form and assign its Caption as ‘Delete’ and Name as ‘Delete_Txt’.And type following code in click event of this button.
Code:
Private Sub Command2_Click()

   LVData1.ListItems.Remove (Val(Index_Lbl.Caption))
   Index_Lbl.Caption = ""

End Sub
(b). Delete Listview Items through Press ‘Delete’ key:
For remove selected item through ‘Delete’ key press from keyboard, just type code in LVData1’s ‘KeyDown’ event. The following code will explain easily.Code:
Private Sub LVData1_KeyDown(KeyCode As Integer, Shift As Integer)

  If KeyCode = 46 Then
     LVData1.ListItems.Remove (Val(Index_Lbl.Caption))
     Index_Lbl.Caption = ""
  End If

End Sub
Here, Keycode=46 is process on ‘Delete’ Key. When you press this key after selecting item, then this will remove that particular row items.
Now These are the tips to Edit or Delete Selected Listview item in visual basic 6.0.
Add ADO Data Control (ADODC) component in vb6.0


terima kasih banyak, ini sangat membantu sekali
ReplyDeleteThanks!!..
DeleteHow to maintain sequence of serial number in listview first row after deleting a row in visual basic vb6
ReplyDeleteHow to maintain sequence serial number in first row of listview after deleting a row from listview in visual basic vb6
ReplyDeleteYou have to programatically edit your serial number's rows with start to end through Loop.like following code:
DeleteDim i As Integer
i = 1
While Not i =MyListView1.ListItems.Count+1
MyListView1.ListItems(i).Text=i
i = i + 1
DoEvents
Wend