How to Add and Design Report Viewer (RDLC) in ASP.Net

In ASP project, if you want to view report, then you have to use ReportViewer or any other Reporting Tools. In this post, SKOTechLearn will explain the steps How to Add Report Viewer in ASP.Net? and also describe the process to Design ReportViewer (RDLC) in ASP.Net.

Reading to this tutorial, there is short UI process to understand about report in ASP.
RDLC ReportViewer Process in ASP.Net
RDLC ReportViewer Quick Process

Pass Parameter with Image in Report Viewer in ASP.Net.

Here we will understand Report process in Two ways.
Add Report Viewer on Existing Form.
Add Report Viewer on other Web Form.

Now, we start step by step procedure for understand.

Step1. Add Web Form and RDLC Report in ASP.Net Project:

First add a web Form in Project then add Report in your application like following steps.

➤ Right Click on Project from Solution Explorer

➤ Find “Add” option and move cursor on it

➤ Next to reach “New Item…” and click on it.

“Add New Items” Screen will appear

➤ In this screen, left side Pane contain "Installed Templates”.

➤ Find “Reporting” Option and select on it.

➤ From “Reporting”, select “Report” option

➤ Then Click on “Add” button.

    These process is described in bellow given figure.
    ReportViewer Control Adding Process
    Report (RDLC)Adding Process
    When you complete these process of adding report on project. “Report1.rdlc” will be add on your project. It will seen inside Solution Explorer screen.

    Learn How to Add Bullet List in ASP.Net with Easy Tips?


    This is the way to add RDLC. There are another process and some more steps to view the report.

    Note: “Report1.rdlc” need the platform where it display the designed template. So, you have to use “ReportViewer” control.


    Step2. Add ReportViewer with Settings:

    After that open “WebForm”. In your Form choose location wherever you want to add “ReportViewer” control. For adding this control on Form, follow the process given bellow:

    Move cursor on “Toolbox” screen to the left side of project.

    Find “Reporting” header and click on it.

    It will show two options (“Pointer” and “ReportViewer”) control options.

    Select “ReportViewer” option and drag on Form’s Location.

    Increase or Decrease this control size according to need.

      ReportViewer with Setting
      Control with Settings
      After that, click on “Tasks” option to this control as describe in above image.

      It will show ‘Choose Report’ combo, select report RDLC which you have create in previous step.

      Now this control will call that particular RDLC.

      Add Menu with Sub-Menu in ASP.Net.


      Step3. Design RDLC Report in ASP.Net:

      Now, let’s Design RDLC Report. For designing process when you right click, the drop down menu will show an option with name "Insert". You can insert some control in RDLC like TextBox, Rectangle etc. And design it according to requirement.
      Insert control on RDLC form
      Insert control on RDLC Form
      After this process run your application. But, when you debug application, you will find an error appearing on Web browser.

      Report Viewer Web.UI.ScriptManager Error in ASP.Net (Solution)


      Error during Execution of Web application:
      Error during application run
      Error during application run

      Why this error occur?

      Lets read error. It says about missing UI.ScriptManager Error. So, we have to add ScriptManager in ASP.Net webform.

      Where to find and How to add ScriptManager in ASP Form?

      There are following way to solve above question.


      Step4. Add ScriptManager in ASP.Net:

      Find “AJAX Extensions” header  from “Toolbox” screen.

      In this header find “ScriptManager”.

      Drag and drop “ScriptManager” on Form.

        Add ScriptManager in ASP.Net
        Add ScriptManager
        After inserting this web control, it will reduce the error which was appearing during run-time.

        How to Design Header, Footer and Sidebar in ASP.Net?


        Step5. Run Web Form:

        Now run Web Form. You will find that there is no error and the output will looks like bellow.
        Report Output in ASP.Net
        Report Output
        So, this post final conclusion is that you have to remember about add “RDLC”, “ReportViewer” web control, “ScriptManager” web control and Inset controls into RDLC for creating or designing Report in ASP.Net by SKOTechLearn Tips.

        Also Learn:

        What is Master Page and How to Implement in ASP.Net?

        Search Files From Folders or Directories in VB.Net through String

        In this post, SKOTechlearn will describe the step by step process for Searching Files through Code in VB.Net for developers, If you want to develop an application which can Search all Files from Folders or Directories in VB.Net through String. We can list all files which contain that string which we use for find files from existing folder or directories or from all folders and Sub-folders.

        Change ProgressBar Color and Change Look in Different Way in VB.Net

        So here, we will proceed with following process.

        1. Search files from particular given path
        2. Search files from dynamic given path

        These two points describe static or dynamic way to Search Files from Folders in VB.Net.

         Which types of controls, we need for File Search?
        For simple understanding purpose, we drag a TextBox, ListBox and a Command Button. Through these controls, we proceed for further process.

        TextBox: For Input Path.
        ListBox: For Search Files' Result.
        Command Button: For Searching Activity.

        Let’s start with simple learning tips with SKOTechlearn.

          1. Search files from particular given path in Vb.Net:

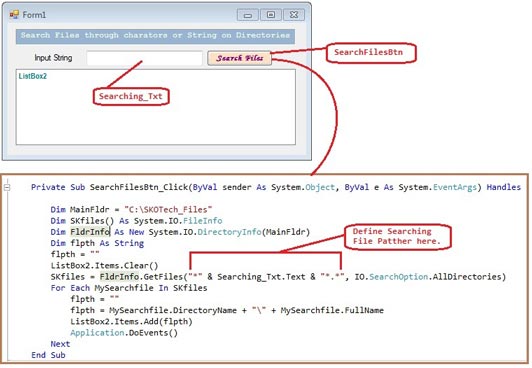
        Suppose you want to find those files which contains particular character or String. And want to describe a fix path with folders and subfolders. But first, take a look of controls adjustment for finding and listing.

        How can we define File's Pattern in Vb.net?
        Search Files Button with Code in VB.net
        Button with Code

        List all Search Files From Directories or Sub- Directories in VB.Net.


        Then write following code inside Command button:
        Private Sub SearchFilesBtn_Click(ByVal sender As System.Object, ByVal e As System.EventArgs) Handles SearchFilesBtn.Click
        
            Dim MainFldr = "C:\SKOTech_Files"
            Dim SKfiles() As System.IO.FileInfo
            Dim FldrInfo As New System.IO.DirectoryInfo(MainFldr)
            Dim flpth As String
            flpth = ""
            ListBox2.Items.Clear()
            SKfiles = FldrInfo.GetFiles("*" & Searching_Txt.Text & "*.*", IO.SearchOption.AllDirectories)
            For Each MySearchfile In SKfiles
                flpth = ""
                flpth = MySearchfile.DirectoryName + "\" + MySearchfile.Name
                ListBox2.Items.Add(flpth)
                Application.DoEvents()
            Next
        End Sub
        
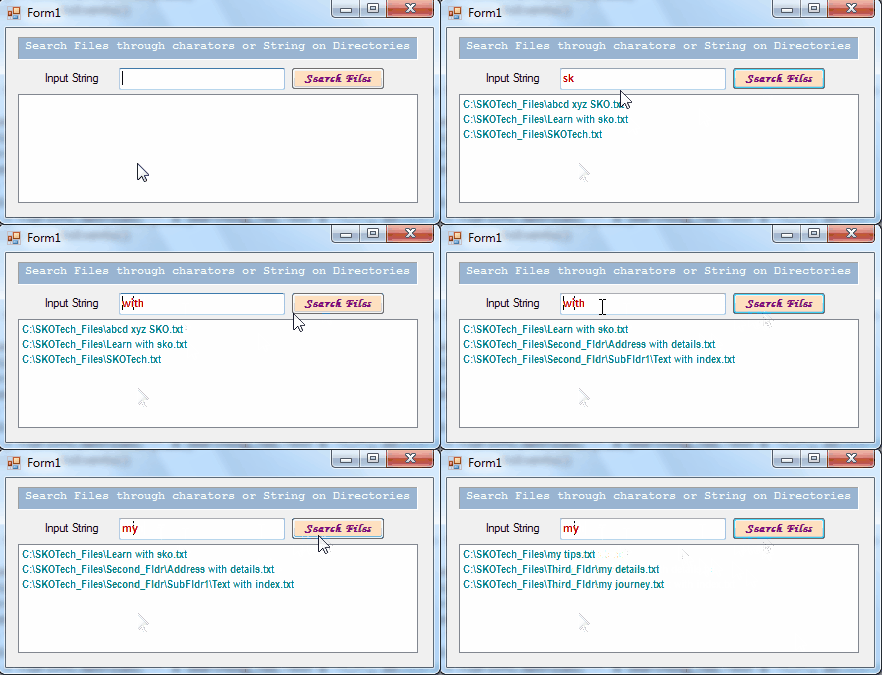
        After complete coding, run the application. Input searching value inside “Searching_Txt” textbox. And press “Search Files” button. You will find you searching value’s containing files will show in “ListBox2” like following.
        Search_File_Output in VB.Net

        Batch process to Create Folder and Copy Files in Specific Created Folders

        2. Search files from dynamic given path in Vb.Net:

        In this process, we have to need another input box like Textbox for browse path dynamic process. So first we have to write code for Folder browse path.

        ➤ First Go to Toolbox and find “FolderBrowserDialog” control.

        ➤ Second drag this control to Form.

        ➤ Then write code inside “Browse..” button which you add for browse directory like following.

        Browse Folder Code:
        Private Sub BrowsePath_Btn_Click(ByVal sender As System.Object, ByVal e As System.EventArgs) Handles BrowsePath_Btn.Click
           If (FolderBrowserDlg1.ShowDialog() = DialogResult.OK) Then
                BrowsePath_Txt.Text = FolderBrowserDlg1.SelectedPath
           End If
        End Sub
        

        After that come to “Search Files” Button and make some changes of code inside its “Click events” which describe just starting of this post. Now take a look of this process code:
        Private Sub SearchFilesBtn_Click(ByVal sender As System.Object, ByVal e As System.EventArgs) Handles SearchFilesBtn.Click
           If Directory.Exists(BrowsePath_Txt.Text) Then
           'put condition if Browse Path is not Blank or  is not exist
              Dim MainFldr = BrowsePath_Txt.Text
              'Show dynamic given path for search
              Dim SKfiles() As System.IO.FileInfo
              Dim FldrInfo As New System.IO.DirectoryInfo(MainFldr)
              Dim flpth As String
              flpth = ""
              ListBox2.Items.Clear()
              On Error GoTo notfound
                SKfiles = FldrInfo.GetFiles("*" & Searching_Txt.Text & "*.*", IO.SearchOption.AllDirectories)
                For Each MySearchfile In SKfiles
                    flpth = ""
                    flpth = MySearchfile.DirectoryName + "\" + MySearchfile.Name
                    ListBox2.Items.Add(flpth)
                    Application.DoEvents()
                Next
              notfound:
            Else
               MsgBox("Directory does not exist", vbExclamation)
          End If
        End Sub
        

        Just copy this code and paste it on your application’s control.

        Note: If you do not change control’s ID according to given description, then change controls id Name from this code same as you mention on your Form.

        How to Fix Google Chrome Not Loading?

        Now, run application, and search whatever your files you want to find from particular directory or directories.
        Dynamic Find Files in VB.net
        Dynamic Find Files
        So, there is the way to Search files from folders or directories through string in vb.net by SKOTechLearn Tips.

        WebPage Design in ASP.Net with Image Guide Step by Step

        Fix Google Chrome Not Working Or Chrome Not Loading Page

        When someone using to browse something on browser and they use Google Chrome, They face the problem of Google Chrome not loading page. And after far waiting, there is no result showing. The Chrome browser only showing the surfing round and round. And you madly waiting for it.

        So, for these types of problem, SKOTechlearn will fix Google chrome not working or Google Chrome not loading page problem in windows 7/8/10.

        Chrome Loading Page in Windows
        Loading Pages before and after fix
        Most of the user asking question that I refresh chrome many times and uninstall and reinstall Google Chrome and clear cache many times and also reboot my system many times. But the problem is same. Please give right solution.

          Why this Problem like Chrome not working or Chrome not Loading Page occur?

        This problem occur due to system’s some missing, corrupt or crash files like:( dll, ocx etc).
        Many times these corrupt files interrupt other installation package. So, we have to face these types of problems. It will occur due to virus or any type of malware which is the cause of all these things.

        So, here we are solving this problem.

          Solution:
        Try the solution which SKOTechlearn mention bellow, may be there are some other solutions, but in my case, the problem has been resolve due to following solution.

        First, Check your system have any antivirus exist or not. If not then it will defiantly cause of some file missing due to virus or another reason. Due to missing or crash of DLL or another supporting file of chrome, it shows the problem of loading page.

        In my case, when I run my windows without any antivirus. And surfing content on chrome browser, the same problem I face.  In compulsion, I have to use Mozila Firefox old version, because Mozila Firefox’s latest version showing the same problem in windows.

        After some months, my close friend suggests me to install Antivirus on my system.

        So, I think, let’s try once.Then, I purchase NPAV (Net Protector Antivirus), antivirus and install it in my system.
        Net Protector Antivirus
        NPAV Antivirus Dashboard
        Friends, you don’t believe that, when I scan my system by this antivirus, and reinstall Google chrome again. And surfing content like google.com, it was a magic that there is no loop of loading website or web address. It began to show all content of any webpage.

        Now, Which is the most important Understandable point is, when we using any antivirus (like: AVG, Avast, NPAV, Caspersky etc) on our system, it fixes all corrupted or crashed dll or Ocx or any supporting files from system which stop or interrupt some supporting file of other installation package like google chrome, Mozila firefox etc.

        Now come to the steps.

        1. Uninstall Google Chrome:
        If you have install chrome before, it is necessary to uninstall it otherwise go to next step.
        Uninstall Google Chrome from windows
        Uninstall Google Chrome
        2. Reboot System:
        It is important that after any uninstall process, there is reboot process necessary for complete uninstall to clear all data that particular application.

        3. Install any Antivirus and Scan drives:
        After that install any antivirus and scan drives specially system drive like "C:\".
        Scan Drive through Antivirus
        Scan "C:\" drive

        4. Download and install Chrome:
        After full scan of drive, go to download page of Google chrome official website through internet explorer. And install it again.
        Download and install Chrome Browser
        Download and install Chrome Browser
        When you process all these steps. You will find a smooth page loading on browser.

        How to open cdr (coreldraw) file and convert it in jpg in Windows?

        So, these are the process and the solution of fix Google Chrome not working or not loading page in windows 7/8/10 with SKOTechLearn.

        3 Easiest Way to Change Text in Uppercase in ASP.Net

        In this post we are going to learn 3 easiest way to Change Text  in Uppercase in ASP.Net in web application by SKOTechLearn. Here, when a user wants to input some string or character into Textbox, and want to change it automatically in capital letter or upper case or you want to press character key from Keyboard it must be converted in capital letter format.

        Glowing Stylish 3D TextBox in ASP.Net

        So the following process will start showing you the desire of automatic Uppercase Letter input, when we key press in small letter.
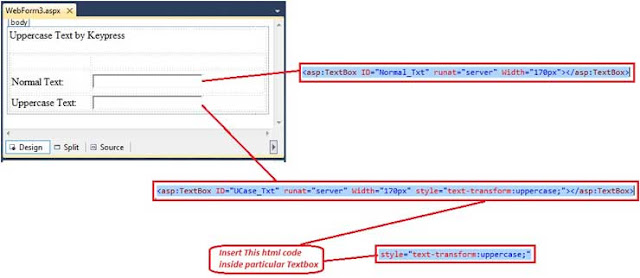
        Text with normal and upper case in asp.net
        Text with normal and upper case
        So here, we will normally learn all given question of this related topic.

        ◉ How can we convert lower case Textbox to Uppercase in ASP.Net?
        ◉ How to type character in Uppercase in ASP.net?
        ◉ How to convert all text to Uppercase in Textbox?

        Further for this process activity, SKOTechLearn will explain all types of short and long process to solve these questions of typing conversion.

        There are following process to convert or change text in Uppercase:

        1. Simple way to Add style code on Particular Textbox>
        2. Write javascript for Uppercase of Textbox during keypress
        3. Write a CSS code for Uppercase

        1. Simple way to Add style code on Particular Textbox:

        For this process choose particular Textbox and go to "Source" screen of your WebForm application.
        Write some HTML style code of particular control’s just mention as following.

        ASP HTML Code:
        <asp:TextBox ID="CustSr_Txt" runat="server" Width="151px"></asp:TextBox>

        CSS Style code:
        style="text-transform: uppercase;"

        Now insert this code like:
        <asp:TextBox ID="CustSr_Txt" runat="server" Width="151px" style="text-transform:uppercase;"></asp:TextBox>

        text_transform_style_code
        text-transform style code
        You can write this particular code in more than one Text control.

        How To Use Menu and Design Menu in ASP.Net?

        2. Write javascript for Uppercase Textbox during keypress:

        For this process, first you have to write javascript function on HTML source code such as following describe:

        JavaScript:
        <script language=javascript>
        
           function UcaseTxt(UpCstr) {
              var UCStr = UpCstr.value;
              UpCstr.value = UCStr.toUpperCase();
           }
        </script>
        You can describe it just bellow of  <body> . Just copy this code and paste there.

        Now, after that call this function on your particular Text control. For calling it, take a look of following html code.

        Call script code:
        <asp:TextBox ID="CustSr_Txt" runat="server" Width="151px" onkeyup="UcaseTxt(this)"></asp:TextBox>

        Calling Javascript Function in controls
        Calling Javascript Function
        Now after this, run application and find that your requirement has been fulfill.

        Stylish 3D Button Style Design in ASP.Net

        3. Write a CSS code for Uppercase :

        For this process, you can add style sheet on your project or you can define style on your particular web application.

        Suppose we will well define style code on webform. For this, find <Head> tag and just bellow of it, write style code same as I mention bellow:

        CSS Code:
        <style type="text/css">
        
           .utxt
            {
               text-transform:uppercase ;
            }
        
        </style>
        

        Call this CSS script on particular control like give instruction.
        <asp:TextBox  ID="CustSr_Txt" runat="server" Width="151px" CssClass="utxt"></asp:TextBox>

        There is two process of define CssClass:

        First is through directly input on particular control in “Source” screen.

        And the second one is select CssClass through “Properties” window.
        Define CssClass through Proerties
        Define CssClass through Proerties
        You well known, where this CSS script will place. But if you don’t know about it, follow the following image.
        Style code inside HTML code
        Style code inside HTML code

        After that, if we choose any one of these process for existing requirement, every process will represent same output as show in following figure.
        Uppercase Text value output in asp.net

        So friends, these are the process for Uppercase text in ASP.Net which SKOTechlearn has explained with step by step process.

        Layout Design (Header, Footer, Sidebar) in ASP.Net

        Now, you can easily put it on your application by learning Uppercase Textbox value in ASP.Net.

        What is Master Page and How To Add and Design in ASP.Net?

        Pass Parameter in RDLC report Viewer & Insert image in Report Viewer in asp.net

        In this article SKOTechLearn describe the easy way that how to Pass Parameter in RDLC Report Viewer in ASP.net with easy tech tips. Passing value through database in RDLC Report in ASP.Net is easy to directly connect through properties.  And here you can learn easily to Pass Image in Report Viewer in ASP.Net.

        But when we talk about run time pass value in RDLC Report then it is something difficult, because If we want to pass image or any dynamic value from textbox to Report Viewer, we have to learn more things for it. So let’s start about what's new regarding to this process?

        How To Create or Design Report Viewer(RDLC) in ASP.Net (Steps With Image)?

        What we will have to remember regarding to Report Designing process?

        ◉ Insert some component or controls in WebForm
        ◉ Add RDLC Report in ASP.Net Project
        ◉ Create Parameter in RDLC Report according to Passing value type
        ◉ Drag all Parameter into RDLC Report form.
        ◉ Add "ReportViewer" web control on WebForm.
        ◉ Add "ScripManager" web control.

        Now, we will learn it through step by step:

        Step1: Create WebForm in ASP.Net and Add Web Controls

        First we have to create new webform and add some web controls including “ReportViewer” and “ScriptManager”

        Remember one thing “ReportViewer” and “ScriptManager” play important role for Showing Report in ASP.Net.
        Add controls in Webform in ASP.net
        Add web controls
        First we Add Report Viewer form in project, we have to save RDLC Form like "Report1.rdlc".

        Design Stylish Button in ASP.Net

        Step2: RDLC Report with Parameter Settings

        RDLC Report Parameter creation with point to point described bellow.

        ➤ Open RDLC, Go to “Report Data” window.

        ➤ Find “Parameter” and right click on it.

        ➤ Click on “Add Parameter…” option.

        ➤ This will show “Report Parameter Properties” screen.

        ➤ Type Parameter name inside “Name” Box and set Data Type as 'Text' from "Data Type:" box. Then press “OK” button.

        Create Parameter in RDLC Report
        Create Parameter with Settings
        As you can see, your created parameter has been added to Parameters Folder.

        How to Pass Parameter in Report Viewer in RDLC in ASP.Net?


        Step3: Image Parameter Creation Settings

        In this step, we will learn how to Pass Image parameter in RDLC Report. For Image Parameter creation, follow the steps.

        ➤ First create a parameter same as created in above given steps.

        ➤ Insert “Image” control on RDLC Form.

        ➤ Right click “Image” report control and find “Image Properties…”.

        ➤ The selection will show “Image Properties” screen.

        ➤ Select “External” option from “Select the image source:” combo in “General" Option.

        ➤ Click on “Function” Parameter Function button in RDLC button from “Use this image:” option.

        ➤ This button will show “Expression” screen.

        ➤ Select “Parameters” option from “Category:” list.

        ➤ Your created name will show in “Values:” list.

        ➤ Input parameter name which you want to create for passing image in Report.

        Inset Image in Report Viewer in ASP.Net.

        Image Properties setting on RDLC
        Image Properties setting
        You can change Image size according to requirement. Choose option “Size” option from “Properties” and this will show the following options.

        Image display size setting:
        Display
        Original Size
        Fit to Size
        Fit to Proportional
        Clip

        For Stretch size, we will choose "Fit to Size" option.

        Add Menu and Design Menu with Different CSS Style in ASP.Net

        Step4: Design RDLC Report

        After that Design your RDLC Form. For designing it, drag created parameter name wherever you want to place like bellow. you can drag it one by one. there is no way to drag with all selection.
        Drag parameter in RDLC Report
        Drag parameter in Report

        Step5: RDLC Report Parameter Pass value Code

        Suppose we want to show value during button’s press. So, let’s write code inside Button’s click event.

        Protected Sub ShwRpt_Btn_Click(ByVal sender As Object, ByVal e As EventArgs) Handles ShwRpt_Btn.Click
           ReportViewer1.LocalReport.Refresh()
           ReportViewer1.LocalReport.ReportPath = Server.MapPath("\Report1.rdlc")
           ReportViewer1.LocalReport.EnableExternalImages = True
           Dim paramtr(3) As ReportParameter
           paramtr(0) = New ReportParameter("ParaCustSrno", CustSr_Txt.Text)
           paramtr(1) = New ReportParameter("ParaCustName", C_NM_Txt.Text)
           paramtr(2) = New ReportParameter("ParaCustMono", C_MN_txt.Text)
           paramtr(3) = New ReportParameter("ParaCustImg", "file:///" + "C:\SKOTechLearn.jpg")
        
           ReportViewer1.LocalReport.SetParameters(paramtr)
           ReportViewer1.LocalReport.Refresh()
        End Sub
        

        For “ReportParameter”, you have to import the given following namespace just above the main class of webform.

        Imports Microsoft.Reporting.WebForms

        When you complete all above process, just run application, and input values inside TextBox and press "Show in Report" button as describe following animated image. And enjoy the reporting at run-time.
        Dynamic pass value in Report Output
        Now, try it yourself to design  a report with passing Parameter in RDLC Report Viewer  and Insert Image in Report Viewer in ASP.net with easy tech tips by SKOTechLearn.

        There is Following other Learning Process:

        Glowing TextBox in Different Style in ASP.Net

        Layout Design (Header, Footer, SideBar, Content) in ASP.Net