If you want to use jRadioButton in Java and want to change Style or create Stylish jRadioButton in Java, you have to use simple steps on you programming in java. So, let's find How to add image in jRadioButton and what style we use to make attractive jRadioButton in Java.
You can say jRadioButton as Option Button in Java.
 |
| jRadioButton's Looks |
How to Set Background image in jFrame in Swing Java?
Default jRadioButton to Graphical jRadioButton:
First of all you have to create some image just look like radio button. For designing it, you can use PowerPoint or googling image and modify according to your desire look.Or you can save following:
OptionButton’s icon category 1:


OptionButton’s icon category 2:


OptionButton’s icon category 3:


These above images are in PNG format with transparent background, you can right click and save it and use it on your project.
After designing and creating image, just go to your Project’s Package and copy all images and paste it on package.
 |
| Copy Files in java package |
When you will copy these option button image, you have to proceed with following point.
GUI Project Design in Java Netbeans
Add image in jRadioButton for front view:
➤ Find “icon” option and select your Image.
➤ Then press "OK" button. and the desire image will work as main option button.
Add image for Focus or Hover Style Image in jRadioButton:
➤ In Properties screen of NetBeans IDE, find “rolloverIcon” option.➤ And Browse your desire Icon for hover style of jRadioButton.
It will change during focus on Option button control.
Add Image for Select Option Style in jRadioButton:
➤ Just same find option “selectedIcon”.➤ After that select you image you have created. And press "OK" button.
The following picture defines all steps.
| Different types of icons selection Process |
Auto Resizing Controls or Component Settings in Java Netbeans
How to Change Look of jRadioButton through Code in Java Swing?
If you want to proceed through coding during runtime change process, here is the following way.Define all icon in Application’s initComponents events.
public JRadioButton_Look() {
        initComponents();
        try{
              // Here MyOptionBtn1 is jRadioButton.
              BufferedImage imgico = ImageIO.read(getClass().getResource("JBtn1.png"));
              MyOptionBtn1.setIcon(new ImageIcon(imgico));

              BufferedImage imgicofocus = ImageIO.read(getClass().getResource("JBtn1_Focus.png"));
              MyOptionBtn1.setRolloverIcon(new ImageIcon(imgicofocus));
              // setRolloverIcon is for when your cursor move on it or focus on it.

              BufferedImage imgicoselect = ImageIO.read(getClass().getResource("JBtn1_select.png"));
              MyOptionBtn1.setSelectedIcon(new ImageIcon(imgicoselect));
              // setSelectedIcon is for when you select this option.

         }catch(Exception ex1){}

    }
There is another long way through code where you have to write code in control’s FocusGained, FocusLost, MouseMoved, ItemStateChanged events. After that you will find same look wise process in it.
How to Set Transparent Background of jRadioButton?
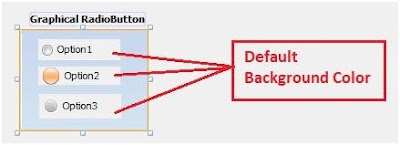
When you drag jRadioButton, it will present in background default color after changing the icon it will contain the background default color as shown bellow. |
| Default background color |
The solution is that you have to unchecked the “opaque” option from “Properties” screen. And the magic will present. The background color will be invisible just same as define following.
 |
| Transparent background Process |
How to use jList to Show Data or Items in Netbeans


0 comments: