When you design you java project and want to show list of data in rows and columns format, you require a table or list, but List only contain one column with multiple rows and table contains multiple columns with multiple rows. You can find complete details of jTable class.
So Friends, here SKOTechLearn will discuss about jTable in Java with details description of Add Column Header in JTable in Java with jTable Grid setting in java NetBeans.
Change jTable's Column Header, Rows, Cell, Selection Color With Simple Steps
Suppose, you want to display some records which contains some Column. Then we have to drag jTable or write code for Adding Column Header in Java with Grid Settigns.
Here we proceed with following way:
So, let’s start with point to point.
After that simply write following code:
When you execute this code this will show the following result:
When all settings will be done, your table will looks like bellow.
Grid Color Setting Code:
Now check it with following code:
This will display output in given following figure:
Or you can simple choose Grid Color from “Properties” window like bellow:
So, In this post you can see, how amazing is to work in java and NetBeans framework. You can simply Add Column Header in JTable and Grid Line Setting in jTable in Java which is detailed explained by SKOTechLearn.
So Friends, here SKOTechLearn will discuss about jTable in Java with details description of Add Column Header in JTable in Java with jTable Grid setting in java NetBeans.
Change jTable's Column Header, Rows, Cell, Selection Color With Simple Steps
Suppose, you want to display some records which contains some Column. Then we have to drag jTable or write code for Adding Column Header in Java with Grid Settigns.
Here we proceed with following way:
- Add Column Header in jTable in Java Code
- Add Column Header in jTable in Netbeans through Properties
- jTable Grid Line Setting in java code
- jTable Grid line Setting in java Netbeans through Properties
So, let’s start with point to point.
(1). Add Column Header in jTable in Java Code :
For Column Header in JTable, you have to import some class as describe bellow:import javax.swing.JFrame; import javax.swing.JScrollPane; import javax.swing.JTable; import javax.swing.table.DefaultTableModel;
After that simply write following code:
import javax.swing.JFrame; import javax.swing.JScrollPane; import javax.swing.JTable; import javax.swing.table.DefaultTableModel; public class MyTableClass { public static void main(String[] args) { // TableModel is use for showing rows and columns DefaultTableModel MyTablemodel = new DefaultTableModel(); //Create New Table JTable MyTableView = new JTable(MyTablemodel); // Add jTable in jScollPane for Showing Column Header JScrollPane MyScrollPane= new JScrollPane(MyTableView); //Add Column Name MyTablemodel.addColumn("MyColHead_ID"); MyTablemodel.addColumn("MyColHead_Name"); MyTablemodel.addColumn("MyColHead_Contact"); //Add jFrame for showing Table inside frame JFrame MyTblFrame = new JFrame(); MyTblFrame.setTitle("jTable Column Header Frame"); //Set jFrame Size MyTblFrame.setSize(410, 320); MyTblFrame.add(MyScrollPane); MyTblFrame.setVisible(true); } }
Note : If you want to add rows and columns, DefaultTableModel will provide facility to do this.
When you execute this code this will show the following result:
(2). Add Column Header in jTable in NetBeans through Properties :
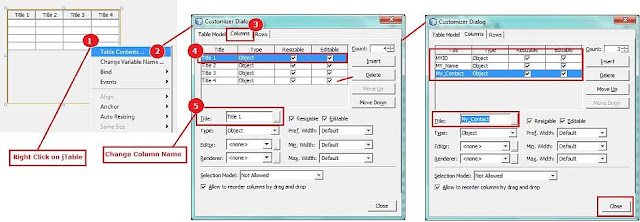
If you are using NetBeans for Java, First drag jTable in jFrame after that simply follow the following steps.1.
Right Click on jTable control and find “Table Contents…” option.2.
Click on “Table Contents…” option. “Customizer Dialog” will be displayed.3.
“Customizer Dialog” contains three tabs (Table Model, Columns, Rows ).4.
For headers, you have to choose “Columns” tab.5.
In “Columns” tab, you will find a table containing “Title, type, Resizable, Editable”. This is use for Column header settings.6.
Choose “Columns” tab which is also contain some buttons(Insert, Delete, Move Up, Move Down).7.
‘Insert’ button is used to add Columns, ‘Delete’ is used for delete Columns, ‘Move Up’ and ‘Move Down’ button is used for move column left or right in jTable according to your requirement.8.
Select ‘Title’ Column from table and go to “Title” box and write your column Name.9.
After that simply close “Customizer Dialog”. |
| Column Header Settings in NetBeans |
When all settings will be done, your table will looks like bellow.
(3). jTable Grid Line Setting in java code :
If you want to change Grid Line color of jTable, first you have to add some rows and then you can write following code which is very simple and one line code.Grid Color Setting Code:
MyTableView.setGridColor(Color.red);
Now check it with following code:
public static void main(String[] args) {
    DefaultTableModel MyTablemodel = new DefaultTableModel();
    JTable MyTableView = new JTable(MyTablemodel);

    //jTable grid Line Settings
    MyTableView.setGridColor(Color.red);

    JScrollPane MyScrollPane= new JScrollPane(MyTableView);
    MyTablemodel.addColumn("MyColHead_ID");
    MyTablemodel.addColumn("MyColHead_Name");
    MyTablemodel.addColumn("MyColHead_Contact");
    // add some rows
    MyTablemodel.addRow(new Object[]{"Col1Row1_0000", "Col2Row1_ABCD", "Col3Row1_XXX0124556"});
    MyTablemodel.addRow(new Object[]{"Col1Row1_0001", "Col2Row1_EFGH", "Col3Row1_XXX01253344"});

    JFrame MyTblFrame = new JFrame();
    MyTblFrame.setTitle("jTable Column Header Frame");

    MyTblFrame.setSize(410, 250);
    MyTblFrame.add(MyScrollPane);
    MyTblFrame.setVisible(true);
  }
This will display output in given following figure:
(4). jTable Grid Line Setting in java Netbeans through Properties :
If you are using NetBeans for creating Swing project, you will find that jTable has no GridLines. First you have to add Gridlines then you can change Grid color according to your requirement.MyTableView.setShowGrid(true); MyTableView.setGridColor(Color.MAGENTA);
Or you can simple choose Grid Color from “Properties” window like bellow:
So, In this post you can see, how amazing is to work in java and NetBeans framework. You can simply Add Column Header in JTable and Grid Line Setting in jTable in Java which is detailed explained by SKOTechLearn.


0 comments: